So, you’ve got the bike, you’ve found the trail, but there’s one problem: getting your ride from A to B safely. Loading a motorcycle into a high truck bed is a recipe for disaster (and a sore back).
Enter the Mockins Hitch Mount Motorcycle Carrier. It’s heavy-duty, rated for 500 lbs., and designed to make your life easier. But a carrier is only as good as its installation. A hitch carrier shouldn't feel like a liability. When installed correctly, it should feel like a rock-solid extension of your vehicle.
This guide breaks down the entire process, step by step, so you can install your Mockins Motorcycle Hitch Carrier confidently without the guesswork or last-minute worries.
What You’ll Need Before You Begin 🧰
Before you start, make sure you have:
- The carrier and all included hardware
- A compatible 2" hitch receiver
- Ratchet wrench and socket set
- Optional but highly recommended: hitch lock or pin
- A friend to help (optional but helpful)
Pro tip: Lay out all parts first. If something looks missing now, it’s better than discovering it mid-install. Having everything ready will make the process faster and less stressful.
Step 1: Check Your Hitch Compatibility 🔍
Before you start, your vehicle needs to be up to the task.
- Receiver Size: This carrier is built for a 2-inch hitch receiver.
- Tongue Weight: Verify your vehicle's tongue weight capacity. Remember, the combined weight of the carrier (heavy-duty steel!) and your bike must be within your vehicle's limits.
- Clearance: The Mockins design provides 31.5 inches of clearance from the hitch pin hole, perfect for most SUVs and trucks.
Pro tip: Remember to also inspect your hitch receiver to make sure it’s clean, free of rust, and ready for hardware.
Step 2: Slide and Secure (The Core Connection) 🛠️
Slide the carrier’s shank into your hitch receiver.
- The Pin: Align the holes and insert the included hitch pin and clip.
- The Mockins Advantage: We include an Anti-Tilt System and hitch stabilizer. Do not skip this! Slide the stabilizer onto the shank before inserting it into the receiver. Once the pin is in, tighten the bolts on the stabilizer to eliminate the metal-on-metal "clank" and prevent side-to-side wobble.
Step 3: Mount the Dirt Bike Carrier Frame 🏍️
With the shank secured, it’s time to attach the cargo carrier platform.
The hitch carrier frame will usually:
- Bolt onto the shank assembly.
- Feature pre-drilled holes for easy alignment.
- Include heavy-duty hardware for long-lasting strength.
Pro Tip: Insert bolts through the mounting points and tighten by hand first. Tighten incrementally instead of cranking one bolt all the way down at once. This keeps everything square and reduces stress on the hardware.
Step 4: Deploy the Loading Ramp 🎢
Forget lifting. The 47-inch movable loading ramp is the secret to a stress-free solo load.
- Attach the Ramp: Either to the left or right side of the carrier (depending on where you have more room to maneuver).
- Stress Test: Make sure the ramp is solidly attached to the main track before you start the walk-up. A properly secured ramp makes loading safer and prevents sudden weight shifts that can stress the carrier.
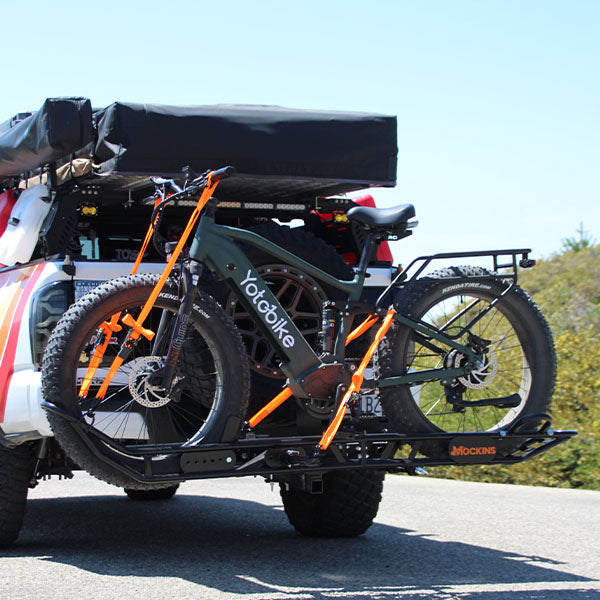
Step 5: The Load & Secure (The 4-Point System) ⚓
Walk your bike up the ramp and into the 73-inch track. The track accommodates tires up to 5.5 inches wide.
- Ratchet & Loop Straps: Use the 4 ratchet straps and 4 loop straps included in your Mockins set.
- The Geometry: Secure the front and rear of the bike. Compress the suspension slightly as you tighten the ratchets—this prevents the bike from "bouncing" loose if you hit a pothole.
- Tuck Your Tails: Once tight, store the excess strap length so it doesn't flap in the wind.
Step 6: Final Safety Check 📐
- Reflectors: Check the reflective strips on the carrier are clean and visible for low-light driving.
- The 20-Mile Rule: As with any hitch accessory, pull over after the first 20 miles to double-check the tension on your straps and the stabilizer bolts.
Pro Tip: Regularly rechecking hardware pays off over long road trips and repeated use.
❌ Common Installation Mistakes to Avoid
❌ Skipping the anti-tilt system
❌ Installing on uneven ground
❌ Overlooking tongue weight limits
❌ Forgetting to retighten after a test drive
✅ What to Do Instead
✅ Use stabilizers and anti-tilt hardware
✅ Tighten bolts evenly
✅ Test before loading
✅ Recheck periodically on long trips
Why Choose Mockins for Your Ride? ✨
We didn't just build a rack; we built a system. With rust-resistant alloy steel and a complete accessory kit (stabilizer, straps, and storage bag), the Mockins Anti-Tilt Motorcycle Carrier is built for the long haul.
Stop struggling with ramps and truck beds. Start hauling smarter.
Get the Mockins Hitch Mount Motorcycle Carrier & Loading Ramp Today! ➡️